
Render Robot for KeyShot User Guide
This guide explains the installation and usage steps of Render Robot for KeyShot application.
Prerequisites
Steps to complete before installation
The following requirements must be met to use Render Robot for KeyShot:
KeyShot License
You must have an active KeyShot license. You can use a trial version or full license.
KeyShot Installation
KeyShot must be installed on your computer.
KeyShot Activation
You must have run KeyShot at least once to complete the license activation.
Important
Render Robot works by using KeyShot's background processes (headless rendering). Therefore, it is critical that KeyShot is properly installed and activated.
Get a KeyShot License
Visit our website for detailed information about KeyShot Studio licenses and pricing options.
Learn MoreInstallation
Download and install the application
Download
- Go to www.yedikare.com.tr/keyshot/robot/en
- Fill out the form and submit
- Click the link sent to your email to download the installation file
Web Browser Warning
Your browser may show a "Suspicious file" warning. Click "Keep anyway" or "Save" to continue downloading.
Installation Wizard
Run the downloaded KeyShotRobot_Setup_X.X.X.exe file (X.X.X is the version number).
Windows SmartScreen Warning
Windows may show "Protected your PC" warning. In this case:
- Click "More info" link
- Click "Run anyway" button
| Step | Description |
|---|---|
| 1. Language Selection | Select the language for the installation wizard |
| 2. Installation Location | Default location: AppData\Local\YedikareYazilim\RenderRobot. Use "Browse" button to change. Continue with "Next" |
| 3. Shortcuts | Check options to create Desktop and Start menu shortcuts. Continue with "Next" |
| 4. Installation | Click "Install" button to start the installation |
| 5. Completion | Click "Finish" when installation is complete. By default, the application will open automatically |
First Run
Configure Render Robot
When you run Render Robot for the first time, the application will guide you through the configuration process step by step.
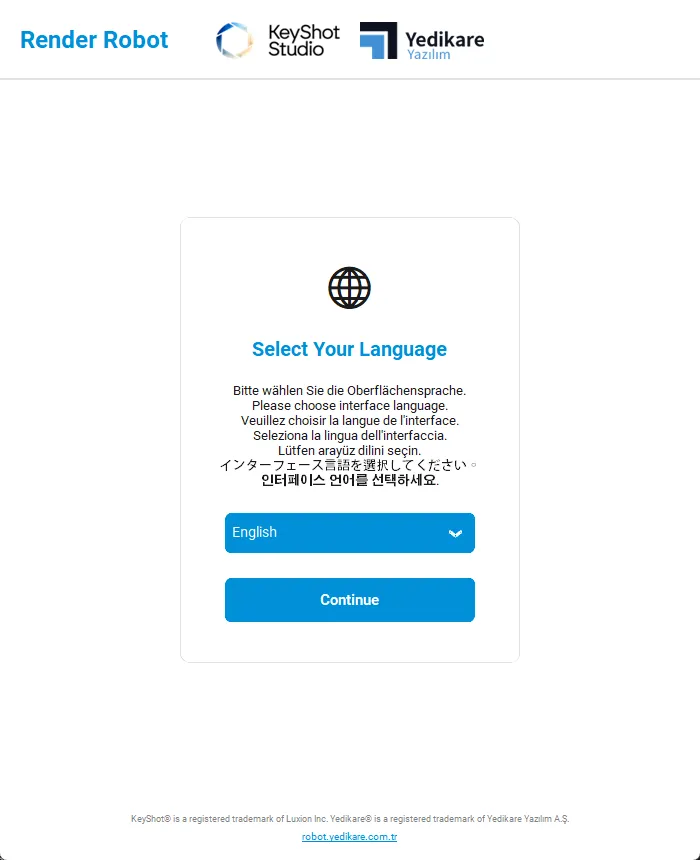
Language Selection
When you first open the application, you will be asked to select the interface language.
Steps:
- 1 Select your preferred language from the dropdown menu
- 2 Click the "Continue" button
Tip: You can change your language selection later from the Settings menu.
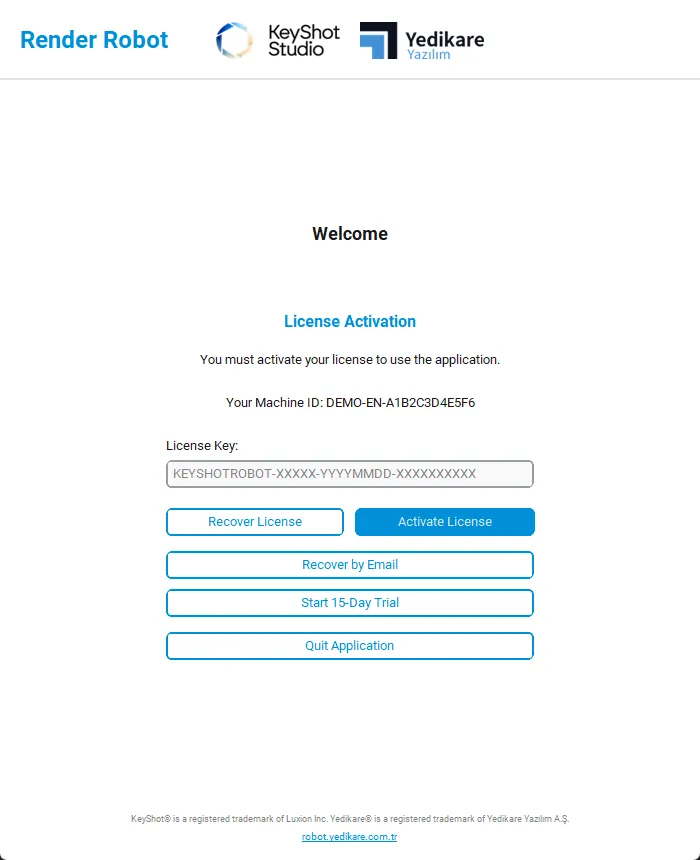
License Activation
The license activation screen appears after language selection.
| Button | Description |
|---|---|
| Recover Existing License | Automatically finds if a license was previously activated on this computer |
| Activate License Key | Activate by entering your purchased license key |
| Recover via Email | Find your license using your previously registered email address |
| Start 14-Day Trial | Evaluate the product for free for 14 days |
For License Activation:
- 1 Enter your license key in the field
- 2 Click "Activate License Key" button
Note: Machine ID is used to bind your license to this computer.
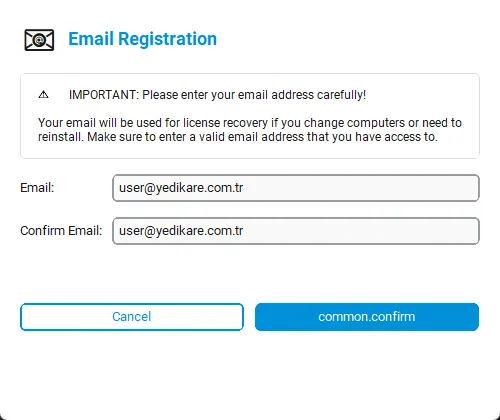
Email Registration
You will be asked to register your email address when activating a license or starting a trial.
Why Email Required?
- To recover your license if you lose it
- To be informed about important updates
- To help you faster with your support requests
Steps:
- 1 Enter your email address in the first field
- 2 Re-enter the same address in the second field for verification
- 3 Click the "Confirm" button
Important
Make sure you enter your email address correctly. An incorrect address may cause problems with license recovery.
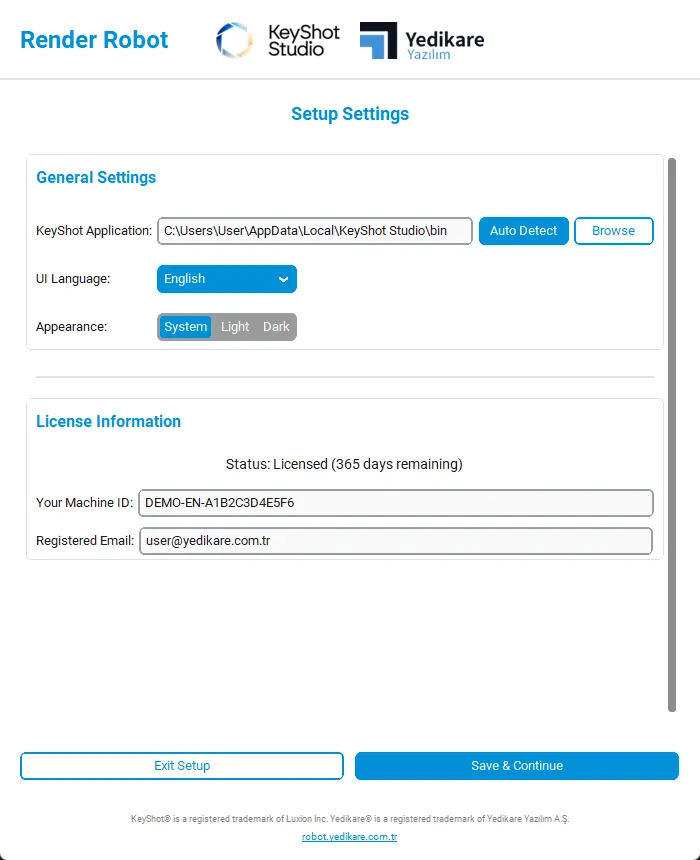
KeyShot Settings
On this screen, you set the KeyShot installation path and application preferences.
General Settings:
| Setting | Description |
|---|---|
| KeyShot Application Location | The folder path where KeyShot is installed. The application usually finds this path automatically |
| Interface Language | The language the application will use |
| Appearance Mode | Light, Dark or System theme |
License Information:
- • You can see your license status and remaining days
- • Your registered email address is displayed
Steps:
- 1 Make sure the KeyShot path is correct (auto-detected)
- 2 Set your preferences
- 3 Click "Save and Continue" button
Note: If the KeyShot path is wrong, you can select the correct folder with the "Browse" button.
Main Application
Configure and start your render processes
The main application window opens after installation is complete.
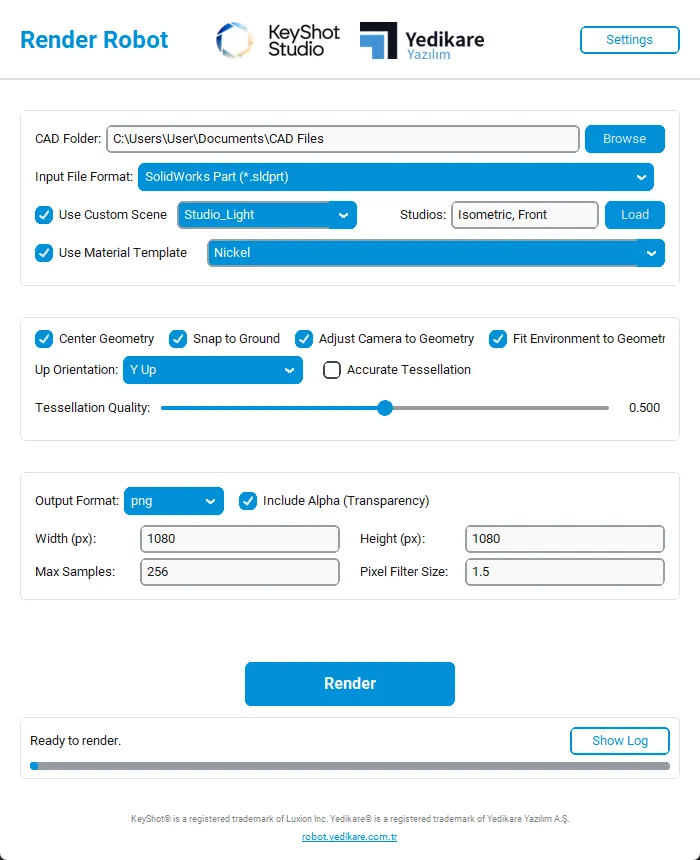
The main window consists of three main sections:
- Source File Settings - Location and format of CAD files to be processed
- Import Settings - How files will be imported to KeyShot
- Render Settings - Output format, dimensions and quality options
Source File Settings
In this section, you configure the settings for CAD files to be rendered.
| Field | Description |
|---|---|
| CAD Files Folder | The folder containing files to be processed. Select with "Browse" button |
| File Format to Process | Select from formats like STEP, IGES, SolidWorks, Rhino, etc. |
| Custom Scene | Check to use a KeyShot scene file (.bip) |
| Studios | Specify which studios in the scene will be rendered |
Custom Scene Usage:
- 1 Check the "Custom Scene" box
- 2 Select a scene from the dropdown menu or select your own scene with "Browse..."
- 3 Optionally click "Load" button to list studios in the scene
- 4 Enter studios to render separated by commas (e.g., Isometric, Front)
Import Settings
Controls how CAD files are imported to KeyShot.
| Option | Description |
|---|---|
| Up Direction | Vertical axis of the model (Y-Up or Z-Up) |
| Tessellation Quality | Surface detail level (1-10, higher = more detailed) |
| Center Geometry | Positions the model at the center of the scene |
| Snap to Ground | Aligns the model to the ground plane |
| Adjust Camera | Sets appropriate camera angle for the model |
| Accurate Tessellation | More accurate calculation for complex surfaces |
Render Settings
Defines the properties of output images.
| Field | Description |
|---|---|
| Output Format | PNG, JPEG, TIFF, EXR formats |
| Width / Height | Render dimensions (in pixels) |
| Include Alpha Channel | For transparent background (PNG/TIFF only) |
| Use Material Template | Applies the same material template to all files |
Material Template Usage:
- 1 Check the "Use Material Template" box
- 2 Select a template from the dropdown menu
- 3 The selected template will be applied to all CAD files
Start Render
You can start the render process after configuring all settings.
Steps:
- 1 Check all your settings
- 2 Click "Start Render" button
- 3 Track progress from the progress bar
During Process:
- Progress bar shows the status of the current file
- Status message shows the processed file name
- You can stop the process with the "Cancel" button
Tip: You can continue using your computer while processing many files, but render speed may be affected.
Troubleshooting
Common problems and solutions
KeyShot Not Found
Make sure KeyShot is installed correctly. Manually specify the KeyShot path in Settings.
License Issue
Check your internet connection. Try license recovery via email.
Render Not Starting
Make sure CAD files are in the selected format. Verify that there is at least one file in the source folder.